Italeri, Dragon, Pegasus, and Plastic Soldier Co. in 1/72 - Up Next

When it comes to painting my "next project" I always have the same problem...  I want to paint so many models that it takes me forever to finish the project :)  This will likely become evident to you in this post.  For my next project I've chosen 6 Vehicles, ~40 Infantry figures, 1 House (not pictured), and 1 Bridge (not pictured).  I've still got a drawer full of T-34's, PzIII's, BT-7's, and a PzIV; those will have to be my "after up next" projects.


Continuing my exploration into 1/72 plastics, I've got several kits that I'm very excited about.  Italeri makes "Fast Assembly" 1/72 kits and I've thrown in a single Tiger I from these kits for good measure (the kits come with two vehicles).  Overall, these are nice vehicles and they appear to be very robust; although not as detailed as a traditional kit.

On the other end of the detail spectrum I've prepared two 1/72 Sdkfz 222 Armored Cars from Dragon...  these are quite detailed and definitely more difficult to assemble.  They are a bit fiddly and I'm not sure how they'll hold up with repeated handling (they'd be fine in a display case); my daughter asked me to buy these for her and I guess I just couldn't say no :)


Continuing my experiment with 1/72 Dragon kits, I added a Henschel King Tiger.  This beast is incredible and I'm very much looking forward to painting it.

To round out the vehicles, this next "batch" has two Pegasus Hobbies BA-6 Armored Cars (another request from the kids);  these aren't the most detailed miniatures around but I got the box of two for around $6 or $7 - so I'm more than satisfied.  My last Pegasus project turned out very nice, so I'm looking forward to these too.


Lastly, I've got the Infantry by The Plastic Soldier Company in 1/72; Germans on the left, Soviets on the right.  With the exception of a couple of weird poses, these are quite nice with lots of details.  I'm very much looking forward to these but with as meticulous as I get with painting Infantry, these might take me awhile!

I've got lots to be happy about and lots to work on; stay tuned and drop in often.  I hope to post as many "in progress" pictures on these as I can.

Pegasus Hobbies KV-1 and KV-2 - My first 1/72 painting

Here they are, my first 1/72 miniatures!  I've got to say, that I am loving this plastic revolution and I'm loving the larger size.  It was fun to have a little extra "canvas" to play with on these (having come from 1/285 and 1/100) and I'm looking forward to what's up next...  I've got lots more plastic 1/72 kits :)


KV-1:  I've always loved this beastly tank.  While it didn't always perform the best in the early years of the war, it certainly gave the Germans a shock at times (and at other times it was a big flop!).


KV-2:  Another "shock" for the Germans, although these had less of an impact than the KV-1.  Pick yourself up a book on the KV series and you'll read several accounts where these tanks held up entire German divisions in some parts (Leningrad).  It's pretty amazing to look at photos of KV-2's that took a real beating; covered in dozens of shell impact marks.


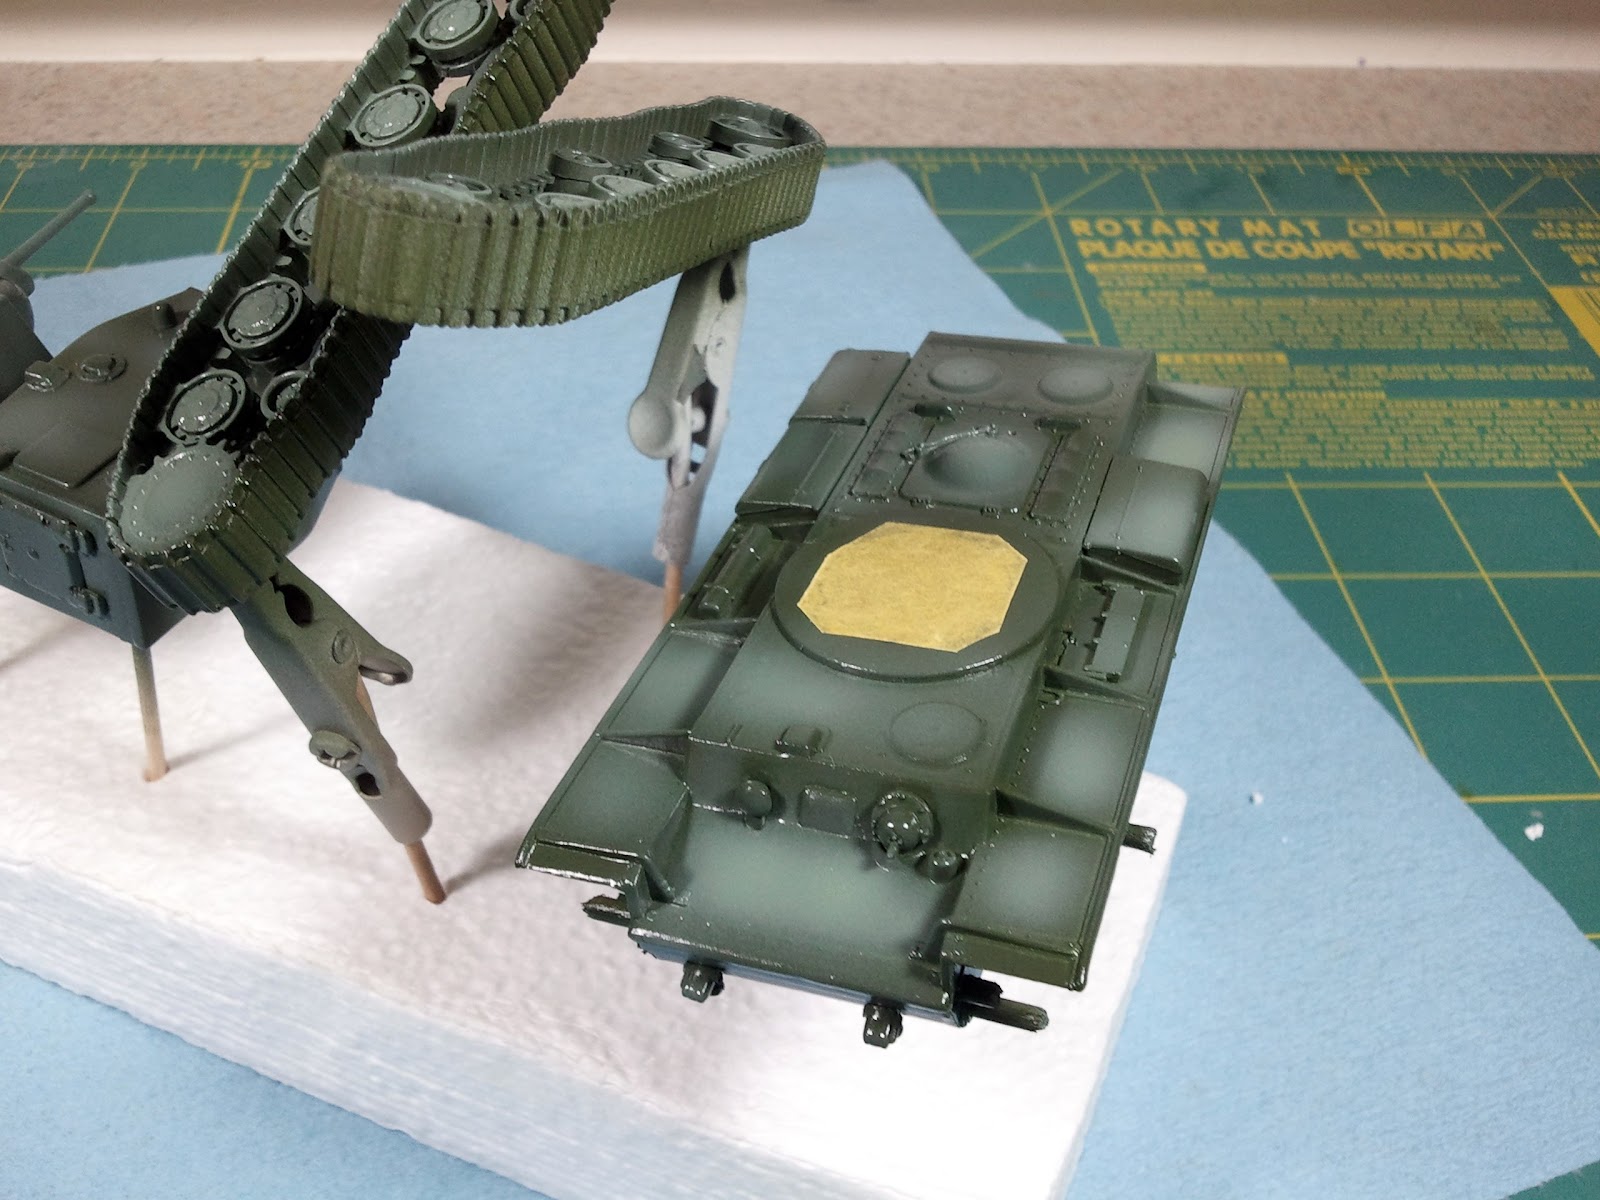
These KV's by Pegasus Hobbies are a good solid kit; they are quick and easy to assemble and the detail is pretty good at 1/72.  They aren't as good as the best kits obviously but for a quick assembly kit I was happy. I started off by coating them with Vallejo Grey Polyurethane Primer (I love this stuff!) using my airbrush.


Next, I coated them with Vallejo Russian Green and then followed up with 2 successively lighter coats of Russian Green + White.  These highlight passes were sprayed with the intention of giving a faded look.


Another shot of the base color and highlights; notice that I sprayed in the center of the panels and left the darker colors on the edges.  After this was completed, I sprayed everything with a coat of Vallejo Gloss Varnish.  Once the gloss varnish was dry, I used Vallejo Black and Brown washes mixed with a little water to darken the panel lines and details.  The Vallejo washes aren't as easy to use as say MIG washes...  but they are not toxic either :)

At this point it was all downhill really...  just the weathering and the decals.  Unfortunately, I was too forgetful (or lazy) to take step by step photos.


I used a mix of I-94 and Battlefront Miniatures decals for the turret markings...  even though these decals were 15mm scale, they seemed to match better with the period photos I used as reference.


The mud is a mixture of Vallejo Panzer Aces Dark and Light Mud colors; I added putty to provide volume.   This was all sponged on lightly with a little soft blister pack foam.  You can't see it the pictures but I waited to mount the wheels and tracks until after I sponged the lower hull with mud.


I added a little black weathering to simulate exhaust and then used diluted Vallejo Black Wash for the oil stains.  Once I matte varnished the vehicle I had to go over the oil stains with a little clear gloss and satin varnish to give it a light sheen.


That's it!  This was a fun project and I've got several more vehicles and figures waiting for me to paint (all 1/72):  Panzer III J, Soviet BA-6, Tiger I, German and Soviet Infantry...  so many hard decisions to make.

I'd love to hear your comments both good and bad so please feel free to post.  If you're interested, here are a few product links for tools used during this project:


Plastic Soldier Company Panzer IV Sneak Peek

Hopefully you've all seen the 15mm Plastic Soldier Company T-34 that I recently finished; it was enjoyable to paint and I've been anxious to see what's up next from PSC.  I was talking with Will at The Plastic Soldier Company yesterday and he was kind enough to share these diagrams with me that detail his next up armor release for both 15mm and 1/72.  It sounds like the 15mm box is planned for April and the 1/72 in May.  I'm really looking forward to picking up a few boxes.

I don't know a whole lot about these yet but I think the pictures speak for themselves!  In my opinion, this is great news.  Be sure to checkout The Plastic Soldier Company at their website.  Thanks for sharing these pictures Will!


15mm Plastic Soldier Company T-34's are da Bomb!

I've got lots of finished pictures today as I cleared off several items on my workbench.  I've been very anxious to start painting my 1/72nd miniatures so I think that gave me the impetus for getting my 15mm stuff done.  Before I go any further I have to say that Plastic Soldier Company's T-34's are awesome to paint; I've said this before but I think we are seeing a new movement in 15mm that will change this market's direction for the good.

I guess I'll treat this post more as a "photo blog" post as really I just wanted to share my finished pictures.  So I'll start off with Ernst Barkmann's Panther and Workshop.  Painting this at the same time as PSC's T-34 was tough because I kept wanting to switch back over to the crisply detailed T-34.

I should also mention that a couple of these sets are available for sale on eBay right now.


Next up, are my 15mm (1/100) Armaments in Miniature Me-109's that I recently posted on.  I have a few more photos now that were taken in my light box.  Great little aircraft!


And last, but not least is the Plastic Solder Company's 15mm T-34 with both the 76 and 85 turret options.  This was a very great idea by PSC and obviously allows you to field more options.


Armaments in Miniature, Me-109 Work in Progress Part 2

Finished!  I need to get some better pictures up; these were taken with my cell phone... I'm so lazy :)  I also finished the bases which were pretty quick and easy to paint.

To pickup where I left off from last week, I started by applying decals to the model; these are a mix of I-94 Enterprises decals and the decals that I picked up from Armaments in Miniature (made by "Wargames"); the Wargames decals are a bit grainy and certainly not as crisp as the I-94 product so I only used a couple of them here (nose mascot and red numeral).

After the decals, I used a very small brush to apply the Vallejo Wash (Black) very carefully into the lines.  You can clean-up any mistakes if you're quick but if you wait more than a few minutes, your clean-up won't be very effective.  Oil stains were applied in streaks using very watered down Vallejo Black paint.


Guns were painted Vallejo Oily Steel and then highlighted with Vallejo Model Air Aluminum.  This same aluminum was used to create some chipping on the wings, fusalage, and canopy frame.

The engine exhaust pipes were painted with the three Vallejo Panzer Aces' rust colors - Dark Rust followed by Light Rust followed by Yellowish Rust.  The shading combination of these colors gives a nice effect.


To finish off the aircraft, I sealed everything with a couple of coats of Testor's Dullcote...  maybe next time I'll try an acrylic matte varnish through my airbrush but I had a can of Dullcote laying around that needed to be used.

The aircaft bases were applied with some Vallejo Coarse Pumice Gel and then painted over with earth tones (can't remember the specific color here) and then drybrushed with a lighter color.  The shafts of the stands were painted with the same Vallejo Sky Grey that I used on the bellies of the aircraft.  Dry grass and ground cover was applied to give the impression of fall vegetation or the Russian Steppes.


To sum up the project, I think Armaments in Miniature has a good product and the detail was nice.  Painting was enjoyable and I think everything turned out pretty good.  If you're interested in purchasing these aircraft for your 15mm army keep your eyes on my commissions page as they are likely to go up on eBay in the near future.

If you missed it, checkout Part 1 of this article.

Armaments in Miniature, Me-109 Work in Progress Part 1

I finally found some time to paint this weekend!  The whole family has been sick in bed so I was presented with a little time to pull out the airbrush booth and paint something new.  A few weeks back I purchased a 3 aircraft flight of Me-109 G's by Armaments in Miniature.  These are 1/100 scale and made from resin; for 15mm wargaming I'd say these are probably the best option around...  They are a little pricey though at $12 to $15 each.

I started by mounting a rare earth magnet on the underside of the fuselage for easy attachment and removal from a flight stand.  One of the great things about this soft resin is is drills easily :)


Many of the flight stand options available from gaming companies don't really fit the bill for what I was looking for...  something simple and cheap.  I crafted these out of a small wooden dowel and disk (looks more like a wooden tire); they turned out ok and for $3 worth of materials from Hobby Lobby I should be able to make a dozen of them.

I'll be coating the base with texture and eventually adding terrain and foliage to give a nice professional look to the stand.  The top of the dowel has a matching rare earth magnet that helps hold the aircraft on.


I used Vallejo's new Acrylic-Polyurethane Grey Primer and applied it using my airbrush.  It went on nice and smooth and had a perfect finish.  I'm quite happy with this new Vallejo product as I don't have to thin it at all; just pour it into the airbrush cup and spray.


I sprayed the fuselage a lightened Vallejo Reflective Green and then added some subtle camouflage patterns using Vallejo Gunship Green.  The underside (while you can't see it here) was sprayed with Vallejo Sky Grey.  Yellow Eastern Front theater markings were applied using Vallejo Flat Yellow.  The paint scheme I chose is loosely patterned after Hannes Trautloft's JG 54 in Northern Russia on the Eastern Front.


To seal the base coat and to prepare for the wash and decals I spraying on a coat of gloss acrylic varnish.  I used Vallejo's gloss varnish and I thinned it with water and airbrush medium; it was a departure from my usual Testor's Glosscote and Dullcote but it was cheaper and non-toxic; time will tell whether I'll like this gloss varnish as a viable option.  I've been looking for an alternative to Testor's spray paints for quite some time.

That's it for now; I'll be sure to post more as I make progress.  Painting aircraft is enjoyable to me; I'm tempted to try and find some 1/72 plastic kits now that I've picked up this plastic craze lately :)

To see the finished project, be sure to checkout Part 2 of this article.

PLASTICS!!! 1/72 Plastic Kits

Wow...  I think I jumped into 1/72 scale with both feet this past week.  Lately I've been in a bit of a plastics craze I think and I stumbled upon several 1/72 model kits and purchased quite a bit.  The picture at the left is just the buildings I picked up; I have several armor kits and infantry platoons somewhere in the mail.

...Sssshhh, don't tell the wife...

I've always been well aware of 1/72 (20mm for others) but I never really explored what was available.  I was surprised to find several kits that interested me keenly and I splurged.  Pegasus Hobbies makes several items for Eastern Front and Italeri has quite a few buildings that look great as well!  To be truthful, I've never been as much into the wargaming aspect of historical miniatures as much as the painting.  I've never liked assembling complicated kits either...  I'm hoping that these kits will give me an excellent balance between detail/accuracy and easy assembly; and at the same time give me a chance to paint and game a little when I get the urge.

I'll be sure to update with pictures and projects as I progress through painting these kits and I'm looking forward to painting something bigger than 1/285 and 15mm for a change.  If anyone has good recommendations for resources on 1/72 please comment, I'd love to hear the feedback.

Stay tuned...
Related Posts Plugin for WordPress, Blogger...