My New Bridge - Italeri 1/72 Stone Bridge

I'm finding that 1/72 modelling has a decent amount of accessories and terrain available; one such piece is a stone bridge by Italeri.  The pictures of this bridge looked nice so I picked one up and decided to give it a try.  Once it arrived I was a little disappointed with the detail of the bricks.  The capstones are nice and look accurate but the individual bricks look like someone sculpted them using a paper clip.  Fortunately, a nice paint job seems to hide this flaw and it ended up looking pretty nice.


I painted the base coat with Vallejo Stone Grey and then the individual bricks with various earth/stone colors. I also applied some pumice gel on the road bed, followed by dirt and mud textures.  I added a little foliage in the form of dried grass in the corners of the road bed and then some creeping ivy growing up from the undersides.


I'm really pleased with the final look of this bridge and I'm looking forward to completing more buildings and terrain features for a more complete landscape.

Dragon 1/72 Sdkfz 222 Model Kit

I wanted to post a couple of photos of a Dragon Models 1/72 kit that I just finished.  It is a set of Sdkfz 222's (2 per box) and as is the case with their other 1/72 offerings these are very nicely detailed.  As for wargaming use I'm not sure how these will hold up; each wheel is supported by only a thin plastic axle that I can see breaking in the near future.  There are some wishbone suspension pieces that could likely work as additional support if they were assembled/glued just right, but I couldn't get this to stay put.


The tires were a very nice touch and actually very easy to paint; the rim is well defined and prevented any rubber colored paint from bleeding over (I hate it when that happens painting tires).  There were some small details that were a bit frustrating to get glued on (tow hooks, brass etched canopy, etc.) but once on they were fine.


I decided not to do any paint chipping and stuck to the smooth Panzer Grey with a few mud splatters here and there.  I always enjoy painting mufflers for some reason and these had some nice big ones, unfortunately they are on the undercarriage so not entirely visible.

This turned out being a fun little project and the painting only took me a few hours start to finish.  Comments and feedback are appreciated, I hope you enjoy!

Italeri 1/72 Tiger I E - Finished Pictures

I won't provide much commentary but here are a few photos of my recently completed Italeri 1/72 Tiger I E.  Paints are almost all exclusively Vallejo.  If you are interested in how I painted this model, you can visit Part 1 and Part 2 of a tutorial I put together.  Feel free to post comments and feedback, Enjoy!


Italeri Tiger I in 1/72 - Part 2

Who's up for Round Two?!?  Unfortunately I didn't find myself with enough time to finish both the Dragon King Tiger and the Italeri Tiger IE, so this article will only include the latter.  Overall, for a fast build kit this Italeri 1/72 Tiger turned out pretty good and I had fun painting it.  The tracks obviously stand out without much detail but I still like how they turned out.


After giving everything a gloss varnish coating (in Part 1 of this tutorial) I applied a Vallejo wash to all the lines and recesses.  I used Vallejo Black and Brown wash and mixed it with a little water so it wasn't quite so thick and dark.  I used a small brush and just touched it off on the lines.  I also painted the tracks using Vallejo Track Primer.


Next I used Vallejo Pale Sand to highlight some of the paint chips and then covered it in Vallejo German Camo Black Brown.  This step can be overdone so be careful not to make the chips too large and blocky.  I also used some soft foam to apply finer chipping and wear around the cupola using Vallejo Panzer Grey.  I like the look and techniques that Mig Jimenez uses on his models and a lot of these steps are based on his F.A.Q. book.

I painted the cables using the same German Camo Black Brown, then I applied the decals.  To seal everything in, I sprayed a coat of Testor's Dullcote.


These last weathering stages helped to tone down the chipping and make the vehicle look a little dirty and worn.  I applied a few thinned down coats of Vallejo Light Mud to make the vehicle look a little dustier; I thinned with water.  Next, I applied Vallejo Dark Mud using soft foam to splatter the vehicle with mud...  especially the road wheels and tracks.  Then I gently went over the Dark Mud with Light Mud (using foam again).  The lighter mud is just to give contrast and the appearance of the mud drying in spots.  You can mix the Vallejo Mud colors with a filler to give it volume if you like; I used Vallejo Plastic Putty.

Finally, I painted the tool handles with Vallejo New Wood and Old Wood; I used Vallejo Oily Steel for the metallic pieces.  I coated everything with Dullcote and then using Vallejo Black Wash applied some fresh oil stains.


One thing that I discovered once I was finished is that these Italeri Fast Assembly Kits don't hold together at all with non-toxic plastic weld (like Micro Weld from Microscale Industries).  Fortunately, I glued the model with Tamiya Plastic Cement before painting and it was just the tracks that I attempted to use the non-toxic cement on...  it had the same effect as using water...  nothing :)

That's it!  Thanks for reading.  If you missed Part 1 be sure to check it out.  Also, if you are interested, here are a few more finished pictures.

Dragon King Tiger and Italeri Tiger I in 1/72 - Part 1

After a few grueling weeks at work, I found some time to paint this weekend; I was excited too because I have several nice plastic kits just waiting for a fresh coat of paint (and a good mud bath).  I used to HATE putting any type of model kit together, but I'm actually enjoying 1/72 because there aren't hundreds of pieces like 1/35.  I've also picked up some nice tools recently which actually makes the process kind of fun.


First up is a King Tiger kit by Dragon Models; this is nice indeed and very detailed.  I didn't mind the 50 road wheels at all because everything went together so well.  The single piece soft plastic (vinyl?) tracks are very detailed and weren't as rubber band looking as I had thought.


The second model is a Tiger I E by Italeri; this is a kit from their Fast Assembly line and while it's not nearly as detailed as the Dragon King Tiger it's not bad either.  The Tracks are probably the most lacking area of the design but it's marketed toward wargaming, which is how I stumbled upon it.  It seems pretty tough and durable, without any brittle details.


After cleaning a few mould lines, gluing (plastic cement), and applying masking tape in the areas that I didn't want paint, I sprayed a coat of Vallejo's Grey Acrylic Polyurethane Primer.


Same treatment for the Tiger I.  I've mentioned before that I really like Vallejo's new Polyurethane Primer...  it goes on so smooth and is very durable.  Vallejo has some new additions to this primer product line to match World War II Armor colors (Dunkelgelb, Grey, Allied Green); I'm very anxious to get my hands on some but I'm not yet willing to pay the high prices from the UK as I haven't seen it in the U.S. yet.


Next, I sprayed my basecoat: Vallejo Middlestone.  I use Vallejo's Model Color range and then mix about 50/50 with Liquitex Airbrush Medium and a few drops of water.  After the basecoat I highlight by mixing 1:3 (or 1:4) Middlestone:White; this is sprayed over larger panels leaving the darker Middlestone lightly showing through on edges and corners.


Again, same thing on the Tiger I.  You can see the dark contrasting color of the original Middlestone coat on the masking tape in the center of the turret ring.  Most of the model gets the highlight and just the edges remain slightly darker.


I really like the look of a single tone Dunkelgelb tank, so I'm always tempted to stop the airbrushing here.  However, one or two additional camo colors are more accurate for late war heavies like the Tigers.  For the green I used Vallejo Reflective Green and German Camo Bright Green (mixed 50/50).  The brown is Vallejo Flat Earth.


Overall I'm pretty happy with how the camo turned out...  I think it'll start to look even better as I apply washes, wear, and possibly a color filter.  After the camo, I sprayed gloss varnish over everything; this was done by mixing Vallejo (Model Color range) Gloss Varnish with Liquitex Airbrush Medium (50/50).

Now...  I really hope I can get back to these soon.  My last tank took well over a month to complete :)  I've finished Part 2 so be sure to check it out!

Italeri, Dragon, Pegasus, and Plastic Soldier Co. in 1/72 - Up Next

When it comes to painting my "next project" I always have the same problem...  I want to paint so many models that it takes me forever to finish the project :)  This will likely become evident to you in this post.  For my next project I've chosen 6 Vehicles, ~40 Infantry figures, 1 House (not pictured), and 1 Bridge (not pictured).  I've still got a drawer full of T-34's, PzIII's, BT-7's, and a PzIV; those will have to be my "after up next" projects.


Continuing my exploration into 1/72 plastics, I've got several kits that I'm very excited about.  Italeri makes "Fast Assembly" 1/72 kits and I've thrown in a single Tiger I from these kits for good measure (the kits come with two vehicles).  Overall, these are nice vehicles and they appear to be very robust; although not as detailed as a traditional kit.

On the other end of the detail spectrum I've prepared two 1/72 Sdkfz 222 Armored Cars from Dragon...  these are quite detailed and definitely more difficult to assemble.  They are a bit fiddly and I'm not sure how they'll hold up with repeated handling (they'd be fine in a display case); my daughter asked me to buy these for her and I guess I just couldn't say no :)


Continuing my experiment with 1/72 Dragon kits, I added a Henschel King Tiger.  This beast is incredible and I'm very much looking forward to painting it.

To round out the vehicles, this next "batch" has two Pegasus Hobbies BA-6 Armored Cars (another request from the kids);  these aren't the most detailed miniatures around but I got the box of two for around $6 or $7 - so I'm more than satisfied.  My last Pegasus project turned out very nice, so I'm looking forward to these too.


Lastly, I've got the Infantry by The Plastic Soldier Company in 1/72; Germans on the left, Soviets on the right.  With the exception of a couple of weird poses, these are quite nice with lots of details.  I'm very much looking forward to these but with as meticulous as I get with painting Infantry, these might take me awhile!

I've got lots to be happy about and lots to work on; stay tuned and drop in often.  I hope to post as many "in progress" pictures on these as I can.

Pegasus Hobbies KV-1 and KV-2 - My first 1/72 painting

Here they are, my first 1/72 miniatures!  I've got to say, that I am loving this plastic revolution and I'm loving the larger size.  It was fun to have a little extra "canvas" to play with on these (having come from 1/285 and 1/100) and I'm looking forward to what's up next...  I've got lots more plastic 1/72 kits :)


KV-1:  I've always loved this beastly tank.  While it didn't always perform the best in the early years of the war, it certainly gave the Germans a shock at times (and at other times it was a big flop!).


KV-2:  Another "shock" for the Germans, although these had less of an impact than the KV-1.  Pick yourself up a book on the KV series and you'll read several accounts where these tanks held up entire German divisions in some parts (Leningrad).  It's pretty amazing to look at photos of KV-2's that took a real beating; covered in dozens of shell impact marks.


These KV's by Pegasus Hobbies are a good solid kit; they are quick and easy to assemble and the detail is pretty good at 1/72.  They aren't as good as the best kits obviously but for a quick assembly kit I was happy. I started off by coating them with Vallejo Grey Polyurethane Primer (I love this stuff!) using my airbrush.


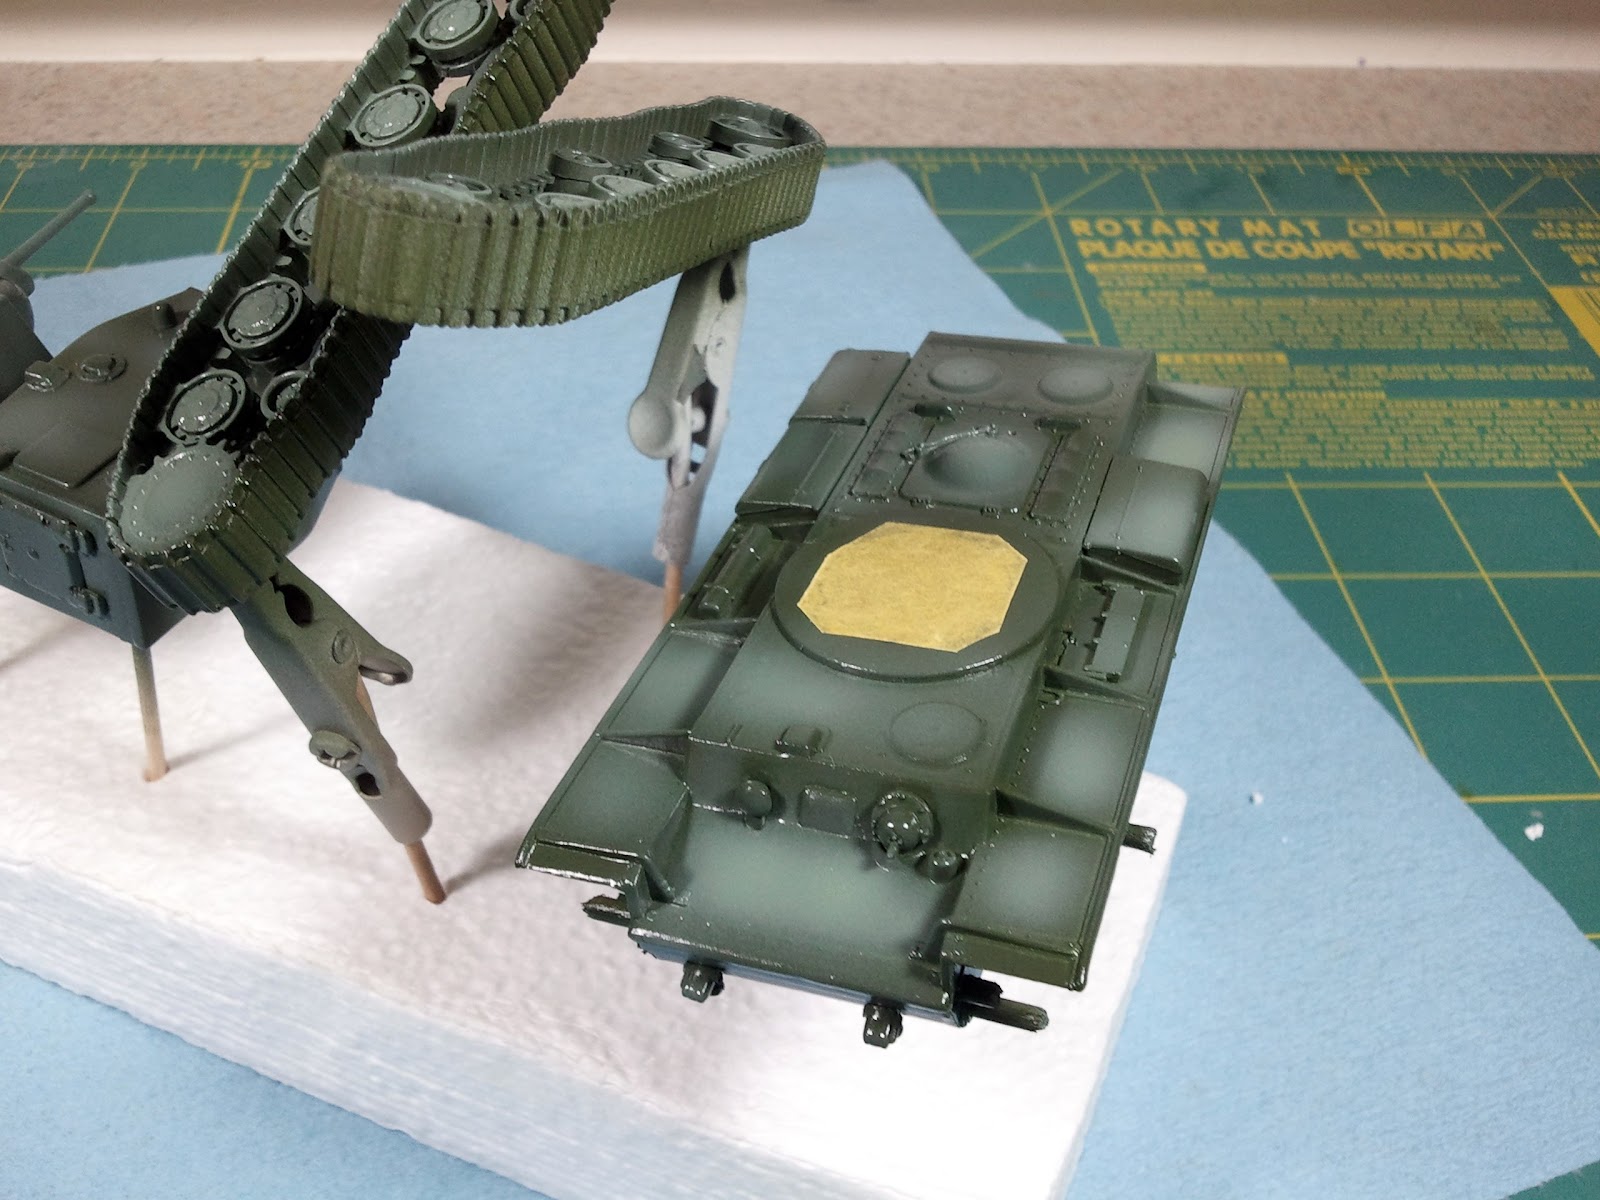
Next, I coated them with Vallejo Russian Green and then followed up with 2 successively lighter coats of Russian Green + White.  These highlight passes were sprayed with the intention of giving a faded look.


Another shot of the base color and highlights; notice that I sprayed in the center of the panels and left the darker colors on the edges.  After this was completed, I sprayed everything with a coat of Vallejo Gloss Varnish.  Once the gloss varnish was dry, I used Vallejo Black and Brown washes mixed with a little water to darken the panel lines and details.  The Vallejo washes aren't as easy to use as say MIG washes...  but they are not toxic either :)

At this point it was all downhill really...  just the weathering and the decals.  Unfortunately, I was too forgetful (or lazy) to take step by step photos.


I used a mix of I-94 and Battlefront Miniatures decals for the turret markings...  even though these decals were 15mm scale, they seemed to match better with the period photos I used as reference.


The mud is a mixture of Vallejo Panzer Aces Dark and Light Mud colors; I added putty to provide volume.   This was all sponged on lightly with a little soft blister pack foam.  You can't see it the pictures but I waited to mount the wheels and tracks until after I sponged the lower hull with mud.


I added a little black weathering to simulate exhaust and then used diluted Vallejo Black Wash for the oil stains.  Once I matte varnished the vehicle I had to go over the oil stains with a little clear gloss and satin varnish to give it a light sheen.


That's it!  This was a fun project and I've got several more vehicles and figures waiting for me to paint (all 1/72):  Panzer III J, Soviet BA-6, Tiger I, German and Soviet Infantry...  so many hard decisions to make.

I'd love to hear your comments both good and bad so please feel free to post.  If you're interested, here are a few product links for tools used during this project:

   
Related Posts Plugin for WordPress, Blogger...