When it comes to painting my "next project" I always have the same problem... I want to paint so many models that it takes me forever to finish the project :) This will likely become evident to you in this post. For my next project I've chosen 6 Vehicles, ~40 Infantry figures, 1 House (not pictured), and 1 Bridge (not pictured). I've still got a drawer full of T-34's, PzIII's, BT-7's, and a PzIV; those will have to be my "after up next" projects.
Continuing my exploration into 1/72 plastics, I've got several kits that I'm very excited about. Italeri makes "Fast Assembly" 1/72 kits and I've thrown in a single Tiger I from these kits for good measure (the kits come with two vehicles). Overall, these are nice vehicles and they appear to be very robust; although not as detailed as a traditional kit.
On the other end of the detail spectrum I've prepared two 1/72 Sdkfz 222 Armored Cars from Dragon... these are quite detailed and definitely more difficult to assemble. They are a bit fiddly and I'm not sure how they'll hold up with repeated handling (they'd be fine in a display case); my daughter asked me to buy these for her and I guess I just couldn't say no :)
Continuing my experiment with 1/72 Dragon kits, I added a Henschel King Tiger. This beast is incredible and I'm very much looking forward to painting it.
To round out the vehicles, this next "batch" has two Pegasus Hobbies BA-6 Armored Cars (another request from the kids); these aren't the most detailed miniatures around but I got the box of two for around $6 or $7 - so I'm more than satisfied. My last Pegasus project turned out very nice, so I'm looking forward to these too.
Lastly, I've got the Infantry by The Plastic Soldier Company in 1/72; Germans on the left, Soviets on the right. With the exception of a couple of weird poses, these are quite nice with lots of details. I'm very much looking forward to these but with as meticulous as I get with painting Infantry, these might take me awhile!
I've got lots to be happy about and lots to work on; stay tuned and drop in often. I hope to post as many "in progress" pictures on these as I can.
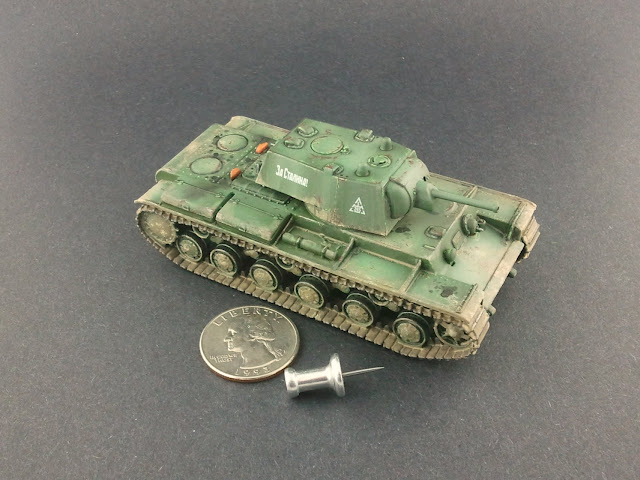
Pegasus Hobbies KV-1 and KV-2 - My first 1/72 painting
Here they are, my first 1/72 miniatures! I've got to say, that I am loving this plastic revolution and I'm loving the larger size. It was fun to have a little extra "canvas" to play with on these (having come from 1/285 and 1/100) and I'm looking forward to what's up next... I've got lots more plastic 1/72 kits :)
KV-1: I've always loved this beastly tank. While it didn't always perform the best in the early years of the war, it certainly gave the Germans a shock at times (and at other times it was a big flop!).
KV-2: Another "shock" for the Germans, although these had less of an impact than the KV-1. Pick yourself up a book on the KV series and you'll read several accounts where these tanks held up entire German divisions in some parts (Leningrad). It's pretty amazing to look at photos of KV-2's that took a real beating; covered in dozens of shell impact marks.
These KV's by Pegasus Hobbies are a good solid kit; they are quick and easy to assemble and the detail is pretty good at 1/72. They aren't as good as the best kits obviously but for a quick assembly kit I was happy. I started off by coating them with Vallejo Grey Polyurethane Primer (I love this stuff!) using my airbrush.
Next, I coated them with Vallejo Russian Green and then followed up with 2 successively lighter coats of Russian Green + White. These highlight passes were sprayed with the intention of giving a faded look.
Another shot of the base color and highlights; notice that I sprayed in the center of the panels and left the darker colors on the edges. After this was completed, I sprayed everything with a coat of Vallejo Gloss Varnish. Once the gloss varnish was dry, I used Vallejo Black and Brown washes mixed with a little water to darken the panel lines and details. The Vallejo washes aren't as easy to use as say MIG washes... but they are not toxic either :)
At this point it was all downhill really... just the weathering and the decals. Unfortunately, I was too forgetful (or lazy) to take step by step photos.
I used a mix of I-94 and Battlefront Miniatures decals for the turret markings... even though these decals were 15mm scale, they seemed to match better with the period photos I used as reference.
The mud is a mixture of Vallejo Panzer Aces Dark and Light Mud colors; I added putty to provide volume. This was all sponged on lightly with a little soft blister pack foam. You can't see it the pictures but I waited to mount the wheels and tracks until after I sponged the lower hull with mud.
I added a little black weathering to simulate exhaust and then used diluted Vallejo Black Wash for the oil stains. Once I matte varnished the vehicle I had to go over the oil stains with a little clear gloss and satin varnish to give it a light sheen.
That's it! This was a fun project and I've got several more vehicles and figures waiting for me to paint (all 1/72): Panzer III J, Soviet BA-6, Tiger I, German and Soviet Infantry... so many hard decisions to make.
I'd love to hear your comments both good and bad so please feel free to post. If you're interested, here are a few product links for tools used during this project:
Subscribe to:
Comments (Atom)


